In the quest for healthy, convenient snacks, no-bake protein bites have emerged as a favorite among fitness enthusiasts and health-conscious individuals alike. Today, we’re diving into a seasonal twist on this popular snack: No-Bake Pumpkin Protein Bites. Packed with the flavors of fall and a nutritional punch, these bites are perfect for anyone looking for a quick energy boost or a tasty treat. Let’s explore how to make these delightful snacks, packed with all the goodness of pumpkin and protein.

Table of Contents
- Introduction
- The Appeal of No-Bake Pumpkin Protein Bites
- Ingredients List
- Step-by-Step Instructions
- Mixing the Ingredients
- Shaping the Bites
- Refrigerating to Perfection
- Nutritional Benefits
- Tips for Perfect Pumpkin Protein Bites
- Customizing Your Bites
- Storage Solutions
- Serving Suggestions
- Frequently Asked Questions
- Conclusion
The Appeal of No-Bake Pumpkin Protein Bites
What makes No-Bake Pumpkin Protein Bites stand out is their irresistible combination of health benefits and seasonal flavors. These bites are not only easy to make but also offer a convenient solution for on-the-go snacking, pre-workout energy boosts, or simply a healthy treat to satisfy your sweet tooth without the guilt.
Ingredients List
To get started, you’ll need the following ingredients:
- Pumpkin puree
- Rolled oats
- Protein powder (vanilla or pumpkin-flavored for an extra seasonal kick)
- Honey or maple syrup for natural sweetness
- Pumpkin spice mix
- Chia seeds or flaxseeds for added nutrition
- Mini chocolate chips (optional)
Step-by-Step Instructions
Mixing the Ingredients
- In a large bowl, combine pumpkin puree, rolled oats, protein powder, honey or maple syrup, and pumpkin spice mix.
- Stir in chia seeds or flaxseeds and mini chocolate chips if using.
Shaping the Bites
- Once the mixture is well combined, use a spoon or your hands to form small, bite-sized balls.
- If the mixture is too sticky, refrigerate it for about 30 minutes before shaping.
Refrigerating to Perfection
- Place the shaped bites on a baking sheet lined with parchment paper.
- Refrigerate for at least an hour to set.
Nutritional Benefits
These pumpkin protein bites are a powerhouse of nutrients, offering a good balance of carbohydrates, proteins, and healthy fats. They’re also a great source of fiber and essential vitamins and minerals, making them an excellent snack for anyone looking to maintain a healthy diet.
Tips for Perfect Pumpkin Protein Bites
- For a smoother texture, you can blend the oats in a food processor before adding them to the mix.
- Adjust the sweetness according to your preference by adding more or less honey or maple syrup.
- If the mixture is too dry, add a little more pumpkin puree or a splash of milk to achieve the desired consistency.
Customizing Your Bites
Feel free to add nuts, seeds, or any other mix-ins you love. These bites are incredibly versatile, allowing you to tweak the recipe to suit your taste preferences and nutritional needs.
Storage Solutions
Store the pumpkin protein bites in an airtight container in the refrigerator for up to a week or freeze them for longer storage.
Serving Suggestions
Enjoy these pumpkin protein bites as a quick breakfast, a post-workout snack, or a healthy dessert. They’re perfect for satisfying hunger and providing a burst of energy anytime, anywhere.
Frequently Asked Questions
- Can I use fresh pumpkin instead of canned puree?
- How can I make these protein bites vegan?
- Are these pumpkin protein bites gluten-free?
- Can I substitute another type of protein powder?
- How long do these bites last in the freezer?
Conclusion
No-Bake Pumpkin Protein Bites are a delicious, nutritious, and convenient snack that embodies the flavors of fall. Whether you’re looking for a healthy treat or a quick energy boost, these protein-packed bites are sure to satisfy. Give them a try and enjoy the perfect blend of taste and health benefits.
don’t forget to try the Pineapple Upside-Down Cupcakes—a charming and delicious twist on a classic dessert. Perfect for any occasion, these individual treats are sure to delight your taste buds and add a sweet note to your culinary repertoire.
Recipe Tips
- Chill Before Shaping: After mixing your ingredients, let the mixture chill in the refrigerator for about 30 minutes. This makes it easier to roll the mixture into balls without it sticking to your hands.
- Customize Your Mix-Ins: Feel free to personalize the bites by adding your favorite mix-ins. Consider options like chia seeds, flaxseeds, or even mini chocolate chips for an extra flavor boost.
- Storage for Freshness: Store your pumpkin protein bites in an airtight container in the refrigerator. They can last for up to a week, making them a perfect grab-and-go snack for busy days.
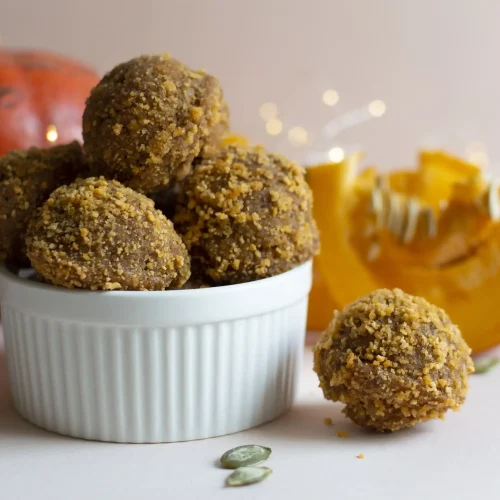
No Bake Pumpkin Protein Bites
Ingredients
- 1 1/2 cups old-fashioned oats gluten-free if needed
- 1 1/2 servings vanilla whey protein powder equivalent to three scoops of the brand used
- 1 1/2 teaspoons pumpkin pie spice
- 1/3 cup plus 1 tablespoon honey
- 1/3 cup nut butter peanut butter used here
- 1/3 cup pumpkin puree
Instructions
- In a bowl, combine the oats, protein powder, and pumpkin pie spice. Set this mixture aside.
- In a separate microwave-safe bowl, mix the honey and nut butter. Microwave this mixture for 30 seconds to soften.
- Stir the pumpkin puree into the honey and nut butter mixture until well combined and let it cool slightly.
- Add the honey, nut butter, and pumpkin mixture to the dry oats mixture. Mix thoroughly until everything is well incorporated and forms one cohesive dough ball.
- Chill the dough in the refrigerator for 15-20 minutes to make it easier to handle.
- After chilling, form the dough into 1-inch balls. Place these balls in an airtight container.
- Store the protein balls in the refrigerator to keep them fresh.